In modern conditions, fluorescent and LED lamps are becoming increasingly important, a real competition has developed between them. Therefore, now often replaced by LED fluorescent lamps, due to the undeniable advantages that the latter have. What is the reason for such a stir around LED lamps?
LED lamp benefits
Compared with fluorescent, LED bulbs have high environmental cleanliness. This is due to the fact that in their design there are no harmful and life-threatening substances. Fluorescent bulbs, on the other hand, contain mercury vapors that pose a risk to human health.
The design of fluorescent lamps gave rise to such a significant drawback as flicker, the frequency of which is noticeable even to the naked eye. Therefore, in rooms with such bulbs, rapid eye fatigue is observed.
These and other advantages of LED bulbs make them as convenient as possible for people. Such lamps are increasingly used in so-called ecological houses, creating a natural perception of the environment for the eyes. The main parameter here is an LED source having a radiation spectrum that is closest to natural. The luminescent spectrum is much lower, which is why individual colors and shades are not perceived correctly.
Replacing bulbs in practice
Despite the fact that there are special lamps, you can put LED lamps instead of fluorescent lamps in their old places. Most importantly, the dimensions allow you to perform this operation. Replacements must be started by removing the starter and throttle from the fluorescent lamp. After this, only wires and lamp sockets should remain. It should be remembered that LED bulbs have their own filters and a voltage regulator.
Connection is made directly to the electrical network, voltage of 220 volts using a three-wire cable. The third core serves as a ground. LED tubes must be installed in cartridges. Installation is done sideways, with a turn until it clicks. It remains only to connect the lamp to the network and install a reflector. After that, the device is ready for operation.
Owing to their economical power consumption, safety and a long service life, LEDs now confidently crowd out many traditional light sources. In particular, T8 fluorescent lamps were everywhere replaced with LED analogues.
Often, it is not the entire lamp that needs to be replaced, but the simple installation of LED lamps in existing ones. And to make this process as simple as possible, manufacturers of LED lamps manufacture them with the same base (G13), and the dimensions completely repeat the dimensions of fluorescent lamps (D \u003d 26mm L \u003d 600 mm / 900mm / 1200mm / 1500mm / 2400 mm). It remains only to slightly upgrade the electrical circuit and you can install LED tubes.
You can see the entire range of these products in the g13 LED lamp section.
Let us consider in more detail the features of installing T8 LED tubes (lamps) in luminaires for fluorescent lamps.
Depending on the type of LED lamp, there are two options for installing lamps:
- With lamp connection on AC 220V (suitable for any source gear).
- With lamp connection on AC 110V (only suitable for luminaires with electronic ballasts).
Note!
- When installing multiple lamps in one lamp, use a parallel connection. Serial connection is not allowed, as this leads to voltage drops and damage to the lamp driver.
- Replacement work must be carried out by qualified personnel in accordance with safety standards and requirements.
1. Connection of lamps on AC 220V
:
The first option requires the direct supply of lamps from the power supply 50 Hz 220 V. In this case, you must first remove all elements of ballasts: an electronic unit or elements of an electromagnetic ballast (starter, inductor, etc.). The power consumption of the lamp will be the sum of the total power of the LED lamps.
Procedure:
- Remove the fluorescent tubes.
- Remove the old electronic circuit: a) remove the electronic control unit; b) remove the starters and remove the ballast from the electrical circuit, disconnect the capacitor, if any.
- Insert the LED bulbs.
- Turn on the power.
Wiring Diagram for 220V LED Direct Lamp

After removing the ballast, the lamps should look something like the photo below (the lamp has been redone for two lamps 1200 mm long). Use the terminals to connect the contacts. 
Luminescent lamp type Arctic 2x36 1200mm in disassembled form on the reverse side after removing all ballasts for connecting LED lamps to 220V.
2. Connecting lamps to AC 110V :
The second option implies that the electromagnetic ballast remains in the circuit, only the starter is removed, such LED lamps are designed for a voltage of 110 V. With this connection, the power consumption of the lamp is the sum of the total power of the LED lamps and the power consumed by the remaining ballast. In this embodiment, electricity will be consumed more than in the first, which means the saving effect will be less. In addition, you must first determine exactly what type of ballasts are installed in the fixtures.
Procedure:
- Switch off the power to avoid electric shock.
- Remove the fluorescent tubes.
- Remove starters, leave ballast (or replace starters with special ones for LED bulbs).
- Insert led lamp
- Turn on the power.
Swivel base What else should you pay attention to:
In luminaires, cartridges are installed differently: horizontally, vertically, and sometimes at an angle. Since fluorescent lamps shine through 360 °, it does not matter for them how to install the lamp in a cartridge. But LED lamps have a directed luminous flux, so you should pay attention to the location of the slot under the cartridge in the lamp base, otherwise it may turn out that the LED lamp does not shine down, but sideways. The most versatile in this case is the swivel base: it fits any lamp. 

LED lamp bases: a) not rotary b) rotary.
We hope that our instructions have helped you choose and connect LED lamps correctly, and now you are fully using all the advantages of modern LED lighting.
Penkov A.A., Stroy-TK LLC, 2014
Our Customers often ask us about the possibility of replacing 36W fluorescent lamps in office fixtures without replacing the fixtures themselves. We analyzed the current state of affairs in this direction in order to clearly understand the Customer’s modernization costs, as well as the pros and cons acquired in connection with this modernization.
We will make a reservation right away, for the experiment we tried to choose LED lamps from famous manufacturers, excluding Noname products from the list of possible applicants. However, if someone from other Manufacturers or Distributors wants to provide their products for testing in our laboratory and the subsequent writing of an article on this product - you are welcome:.
Possible lamp replacement options
We remind you once again that for the experiment we selected LED lamps from famous manufacturers that are as close as possible to the characteristics of standard fluorescent lamps, while excluding Noname products from the list of potential applicants. However, if someone from other Manufacturers or Distributors wants to provide their products for testing in our laboratory and the subsequent writing of an article on this product - you are welcome:.
Go to service .
Often, during the repair of premises, completely normal in appearance, but not working wall and ceiling lamps with fluorescent lamps are thrown out. The owner often says: "Throw away all the old stuff, because we will buy new ones - LED!" A person is simply not in the subject and does not know that you just need to slightly upgrade the circuit, install T8 LED lamps with a G-13 base and use it calmly without buying new lamps, which, together with the discarded ones, will cost much more.
The main points of choosing any LED lamps see.
Design features.
First you need to understand what such lamps are.
In appearance, they completely repeat the shape of ordinary fluorescent lamps, which have been used for years in most public and office buildings. Naturally, inside them, like other LED lamps, there is, and the shape of the housing (tube) is due to the scope, in this case, a direct replacement for obsolete fluorescent lamps.
The housing of the T8 LED lamp is of two types:
- Solid opaque or transparent polycarbonate tube Ø 26 mm;
- The back half of the tube is made of and acts as a radiator, the front one is a polycarbonate diffuser.
Diffusers for T8 LED lamps are available in both transparent and matte. It should be noted here that, according to personal feelings, not very high positioned raster lamps with T8 LED lamps having a transparent reflector are slightly blind and I would personally put such lamps in closed lamps. On the other hand, the opaque diffuser “eats” part of the luminous flux and this must be taken into account when buying.
An LED ruler is used as a light emitter.
Important! Some lamps have a swivel base with a ratchet mechanism, apparently for the possibility of better orientation of the direction of the light flux, and when installing the T8 LED lamp, it will be necessary to trace the correct location of the lamp contacts in the lampholder. IMHO a thoughtful thing, convenient.
The length of the tubes of LED lamps T8 with a base G-13 corresponds to standard sizes: 600, 900, 1200, 1500 mm.
The most popular are LED lamps with a length of 600 and 1200 mm, as they are a replacement for fluorescent lamps with a power of 18-20 W and 36-40 W used in the most common luminaires.
The luminous flux of T8 LED lamps is somewhat lower than that of fluorescent lamps, but in the second, this indicator decreases during the life of the device, which can hardly be said about LED lamps. For example, the well-known company Osram claims that with a service life of 30,000 hours, the decrease in luminous flux will be 0.7.
Benefits.
As always, the life of LED lamps is declared by manufacturers of 30,000 hours or more, but it all depends on the manufacturers of drivers and LEDs.
In general, the replacement of fluorescent lamps with T8 LED lamps has a number of positive aspects:
- Safe and quick replacement of fluorescent lamps with LED ones.
- Maintenance is not required, except for periodic wiping from dust or dirt.
- Energy savings of up to 65% compared with fluorescent lamps on standard ballasts;
- Long declared service life up to 50,000 hours (usually 30,000 hours);
- Lack of flicker. Can be used in kindergartens;
- High color rendering index Ra\u003e 80%. It is important for photo and video shooting;
- Mercury free and RoHS compliant;
- Like all LED lamps, a wide range of operating voltage is 110-240V / 50-60Hz.
Disadvantages.
Almost none, but some premium lamp models are expensive.
Chasing cheapness, you can run into a low-quality product.
Connection.
When upgrading first, you need to turn off the power supply to the lamp, and ideally, remove it altogether.
The second important point is to familiarize yourself with the instructions and the wiring diagram, which is either inside the package or is drawn on it.
- Connection without lamp upgrade. Some T8 LED lamps are designed to be connected with electromagnetic ballasts (only the starter is unscrewed), and work with electronic ballasts is most often not allowed, but there are already such ones.
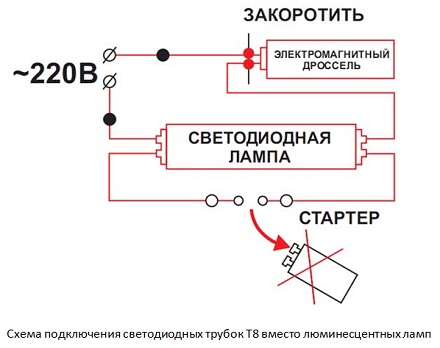
- Others connect directly to the 220 V network. In this case, both the ballasts and the starter are excluded from the luminaire circuit, and 220 V is simply connected to the lamps. Additional wires may be needed here or somehow merge the old ones (depending on the situation).
Here is a typical connection diagram for T8 LED lamps in a luminaire. The number of lamps does not matter much.

And in the end, as always, I found a short video on the network, in which the device and the connection of the T8 LED lamp are shown in a rather simple and amateurish way.